WizFi360 Azure AT Command를 이용하여 Azure IoT Hub에 연결
시작하기 전에#
Hardware Requirement#
- Desktop or laptop computer
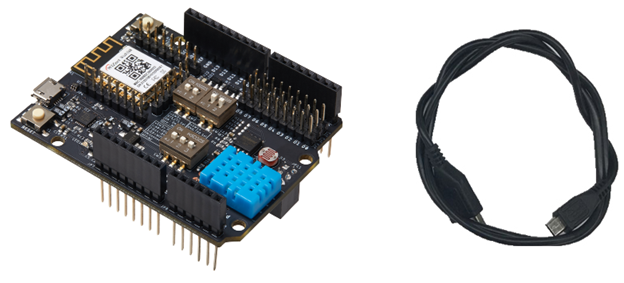
- MicroUSB 케이블
- WizFi360-EVB-Shield
Software Requirement#
- Preferred Serial Terminal (TeraTerm, YAT, etc.)
- Azure IoT Explorer
Azure Portal에 Login을 합니다. 계정이 없는 경우, 계정 생성 후에 Login을 진행합니다.
※ 본 문서는 체험 계정으로 진행합니다.
Azure Portal을 사용하여 IoT Hub 만들기 등 앞선 일련의 과정에 대하여 Azure Cloud 소개를 참조하시기 바랍니다.
소개#
Microsoft Azure 는 Microsoft 의 클라우드 컴퓨팅 서비스입니다. Microsoft Azure 의 서비스에 WizFi360 을 연동하여 데이터를 클라우드로 전송하고, 모니터링 할 수 있습니다.
본 문서에서는 WizFi360 이용하여 MS Azure Services에 연결 방법에 대한 가이드를 제공합니다. 이 프로세스는 다음 단계로 구성됩니다.
- Azure IoT Hub 준비
- IoT 디바이스 등록
- Azure IoT와 연결 및 데이터 통신
Azure IoT Hub 준비와 IoT 디바이스 등록 과정 대해 Azure Cloud 소개 참조하시기 바랍니다.
WiFi모듈 테스트를 위해 WizFi360-EVB-Shield Evaluation 보드를 사용되었습니다.
디바이스 준비#
하드웨어 설정#
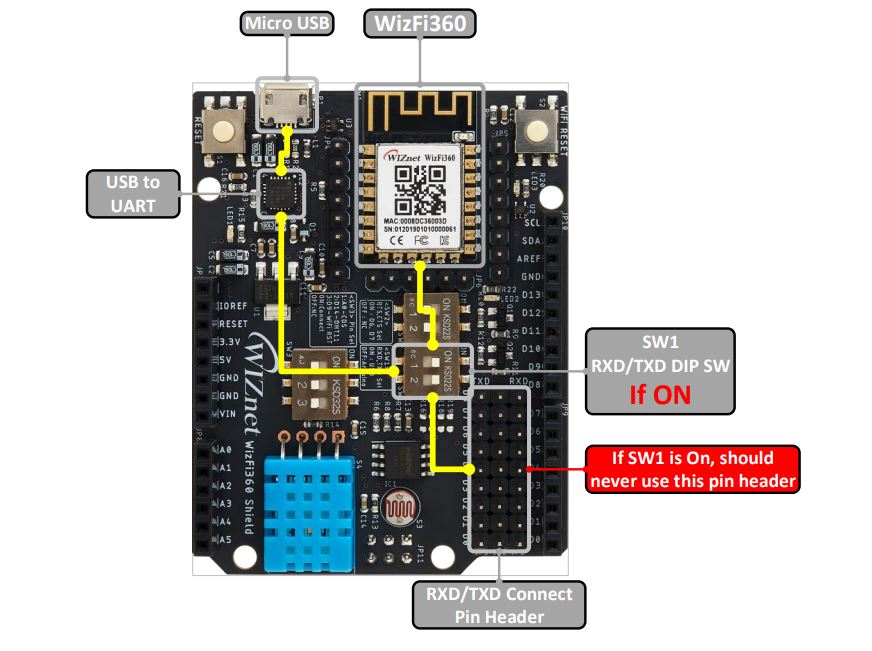
본 문서에서 WizFi360-EVB-Shield가 standalone mode에서 사용됩니다. 따라서 UART를 위해 MicroUSB를 사용할겁니다.
MicroUSB 사용하는경우 SW1을 ON 시키고 MicroUSB 연결해야됩니다.
디바이스 연결#
하드웨어 설정 후 MicroUSB 이용하여 PC와 연결합니다. PC운영체제에서 보드와 연결된 COM 포트를 확인할 수 있습니다.
윈도우 운영체제의 경우, 장치 관리자(Device Manager)에서 COM 포트를 확인할 수 있습니다.
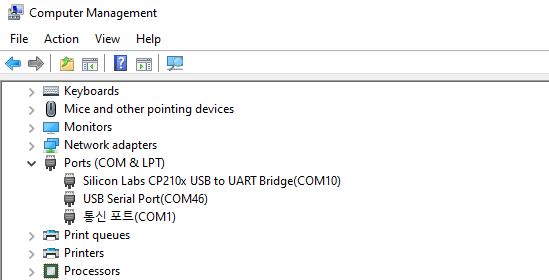
장치 관리자에서 COM 포트를 확인할 수 없는 경우, 다음 링크에서 드라이버를 다운로드하여 설치하시기 바랍니다.
AT 명령어#
1. Set current WiFi mode (not saved in flash)#
AT Command: AT+CWMODE_CUR Syntax:
| Type | Command | Response |
|---|---|---|
| Query | AT+CWMODE_CUR? | +CWMODE:<mode> OK |
| Set | AT+CWMODE_CUR=<mode> | OK |
Defined values:
| Mode | Value |
|---|---|
| 1 | Station mode |
| 2 | SoftAP mode (factory default) |
| 3 | Station+SoftAP mode |
2. Enable DHCP#
AT Command: AT+CWDHCP_CUR Syntax:
| Type | Command | Response |
|---|---|---|
| Query | AT+CWDHCP_CUR? | +CWDHCP_CUR:<para> OK |
| Set | AT+CWMODE_CUR=<para>,<en> | OK |
Defined values:
| Parameter | Value |
|---|---|
| 0 | SoftAP DHCP 와 Station DHCP 를 disable 한다. |
| 1 | SoftAP DHCP 는 enable 하고 Station DHCP 는 disable 한다. |
| 2 | 2: SoftAP DHCP 는 disable 하고 Station DHCP 는 enable 한다. |
| 3 | SoftAP DHCP 와 Station DHCP 를 enable 한다. (factory default) |
3. List available APs#
AT Command: AT+CWLAP Syntax:
| Type | Command | Response |
|---|---|---|
| Query | AT+CWLAP | +CWLAP:([<ecn>,<ssid>,<rssi>,<mac>,<channel>,<wps>]) |
Defined values:
| Parameter | Value |
|---|---|
| <ecn> | 0: Open 1: WEP 2: WPA_PSK 3: WPA2_PSK 4:WPA_WPA2_PSK |
| <ssid> | string parameter. AP의 ssid |
| <rssi> | signal strength |
| <mac> | string parameter. AP의 mac |
| <wps> | 0: WPS는 disable된다 1: WPS는 enable된다 |
4. Connect to AP#
AT Command: AT+CWJAP_CUR Syntax:
| Type | Command | Response |
|---|---|---|
| Set | AT+CWJAP_CUR=<ssid>,<pwd>,[<bssid>] | +CWJAP_CUR:<ssid>,<bssid>,<channel>,<rssi> OK |
Defined values:
| Parameter | Value |
|---|---|
| <ssid> | string parameter. Target AP의 ssid. MAX: 32 bytes |
| <pwd> | string parameter. Target AP의 password. MAX: 64-byte ASCII |
| <bssid> | string parameter, target AP 의 MAC address, 같은 SSID 를 가진 여러 개의 AP 들이 있을 때 사용된다. |
5. Azure IoT Hub configuration set#
AT Command: AT+AZSET
Syntax:
| Type | Command | Response |
|---|---|---|
| Set | AT+AZSET=<iothub_name>,<device_id>,<device_key> | OK |
Defined values:
| Parameter | Value |
|---|---|
| <hub ID> | string parameter. IoT Hub의 ID |
| <device ID> | string parameter. IoT Device의 ID |
| <key> | string parameter, IoT Device의 Key |
6. Set MQTT Topic#
AT Command: AT+MQTTTOPIC
Syntax:
| Type | Command | Response |
|---|---|---|
| Set | AT+MQTTTOPIC=<publish topic>,<subscribe topic>,<subscribe topic2>,<subscribe topic3> | OK |
Defined values:
| Parameter | Value |
|---|---|
| <publish topic> | string parameter, WizFi360 이 publish 하는 topic |
| <subscribe topic> | string parameter, WizFi360 이 subscribe 하는 topic |
| <subscribe topic2> | string parameter, WizFi360 이 subscribe 하는 topic |
| <subscribe topic3> | string parameter, WizFi360 이 subscribe 하는 topic |
Note:
- 이 command 는 broker 에 연결하기전에 설정되어야 합니다.
- <subscribe topic2> 와 <subscribe topic3>는 Firmware v1.0.5.0 이후 version 부터 사용가능 합니다.
7. Connect to Azure#
AT Command: AT+AZCON
Syntax:
| Type | Command | Response |
|---|---|---|
| Set | AT+AZCON | CONNECT OK |
Note: • 이 command 를 전송하기전에 AT+AZSET command 와 AT+MQTTTOPIC command 를 설정합니다. • Connect 이후 AT+MQTTPUB command 를 통해 Azure Sever 에 데이터를 전송합니다. • 자세한 내용은 https://docs.microsoft.com/en-us/azure/iot-hub/iot-hub-mqtt-support 를 참조하세요.
8. Publish a message#
AT Command: AT+MQTTPUB
Syntax:
| Type | Command | Response |
|---|---|---|
| Set | AT+MQTTPUB=<message> | OK |
Note: • 이 command 는 MQTT 가 연결되어 있을 때 사용됩니다. • Publish 한 data 의 topic 은 AT+MQTTTOPIC command 에 의해 결정되며, 사용자는 broker 에 연결하기전에 topic 을 설정합니다.
동작 예제#
시리얼 터미널 연결 및 실행#
시리얼 터미널 프로그램을 실행하여 디바이스 연결 단계에서 확인한 보드의 COM 포트와 Baudrate 115200을 선택하여 시리얼 포트를 연결합니다.
디버그 메시지 출력용 시리얼 포트 설정 정보: 115200-8-N-1, None.
WizFi360모듈의 WiFi 설정#
1. Set Wifi station mode#
| Command | Response |
|---|---|
| AT+CWMODE_CUR=1 // station mode | OK |
2. Set DHCP Enable#
| Command | Response |
|---|---|
| AT+CWDHCP_CUR=1,1 // DHCP enable on Station mode | OK |
3. Get possible Wi-Fi AP List for connection#
| Command | Response |
|---|---|
| AT+CWLAP | +CWLAP : (3,"ssid",-57,"mac address",1,1) // encryption method, ssid, rssi, mac address, channel, wps |
4. Connect to Wi-Fi AP#
| Command | Response |
|---|---|
| AT+CWJAP_CUR="ssid","password" | WIFI CONNECTED WIFI GOT IP |
5. Query WizFi360 device' IP address#
| Command | Response |
|---|---|
| AT+CIPSTA_CUR? | +CIPSTA_CUR:ip:”192.168.10.13” +CIPSTA_CUR:gateway:”192.168.10.1” +CIPSTA_CUR:network:”255.255.255.0” |
다음 AT 명령을 실행하여 Azure 서비스에 연결#
1. Set Azure connection#
| Command | Response |
|---|---|
| AT+AZSET="iothub_name","device_id","device_key" | OK |
2. Set MQTT Topic#
| Command | Response |
|---|---|
| AT+MQTTTOPIC="/devices/{device_id}/messages/events/","/devices/{device_id}/messages/devicebound/#" Example AT+MQTTTOPIC="/devices/testDevice/messages/events/","/devices/testDevice/messages/devicebound/#" | OK |
Note: MQTT Topic follows the rules defined in Azure IoT Hub. Refer to document: Communicate with your IoT hub using the MQTT protocol: Using the MQTT protocol directly (as a device)
3. Connect to Azure#
| Command | Response |
|---|---|
| AT+AZCON | OK |
4. Publish data#
| Command | Response |
|---|---|
| AT+MQTTPUB="{"deviceId":"WizFi360","temperature":28.16,"humidity":46.04}" | OK |
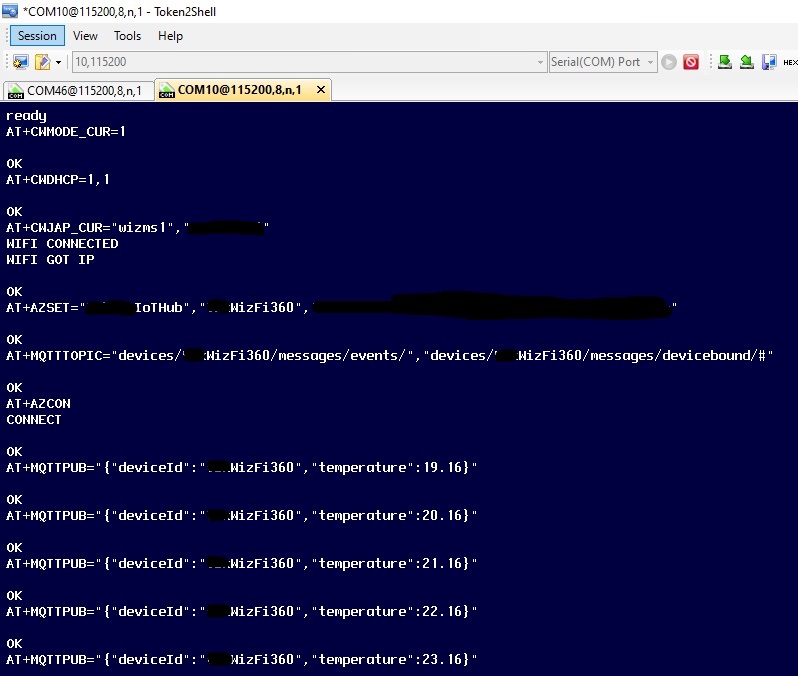
동작 예제 결과#
- IoT Explorer 에서 Telemetry Section안에 "Start" 버튼을 누릅니다.
MQTTPUB 명령을 통해 메시지를 보내기 전에 "Start" 버튼을 눌러야 합니다.
- 터미널에서 MQTTPUB command으로 수신한 데이터를 확인 할 수 있습니다.

다음 단계#
Azure Portal을 사용하여 Stream Analytics 작업 입 · 출력 구성 및 변환 Query 정의
WizFi360 Azure AT Command를 이용한 Azure IoT Hub 연동 예제